Max Windows Openbox Hack

In an earlier post I introduced tiling desktops a.k.a tiling window managers whose notable feature is to make maximum use of screen estate. This post is about how to make Openbox always open maximised windows.

Just in case, make a backup of Openbox main configuration file .config/openbox/rc.xml. This is the file that needs some editing.

Open up the rc.xml and find the section <applications>. This must be a major section, not a command concerning a specific application.

In that section, insert:

  <application class="*">           <decor>no</decor>            <maximized>yes</maximized> </application>     <application type="dialog">         <decor>yes</decor>        <maximized>no</maximized> </application> 

The first codebit tells Openbox to maximise all windows and lose their decorations. If you want to keep the decorations, don’t use the <decor> tags.

The second codebit (beginning with the line containing “dialog”) tells Openbox to exempt dialogs from maximisation. This works for applications that have their dialogs and prompts properly codified as such. Not all of them are properly done. 

Additionally, you may want to exempt some specific apps from getting maximised. For example the messenger: 

  <application class="Pidgin">         <decor>yes</decor>        <maximized>no</maximized> </application> 

Note the class property in application tag. Mostly the ordinary application name fits into that property. Another possibility is to use the name property, which should be the text on the titlebar.

To assign class and name properties rightly, use the command-line tool obxprop which probably comes with every Openbox. It’s used as follows:

  1. In terminal, type obxprop and Enter (it as if stalls, let it be)
  2. Switch to the window whose class/name info you want – by keyboard shortcut, not with mouse
  3. Click on the window
  4. Turn back to the terminal and find the relevant class/name info to put into rc.xml

All necessary changes done, save rc.xml, run openbox --reconfigure and see the effect of the changes to your windowing.

Tiling versus Windowing

In more established terminology, stacking window managers are distinguished from tiling window managers, but I prefer to think of them as windowing desktops versus tiling desktops. The first type is vastly more widespread. Windowing is the main idea behind all Windows releases (it got slightly fuzzier with the unpopular release 8, but was restored in 8.1 and stays so in version 10). Tiling involves specialised and geeky desktops, but is not really more complicated than windowing, particularly if the user is keyboard-centric, as distinguished from mouse-driven.

The main characteristic that sticks out in windowing desktops (‘stacking window managers’ in more established terminology) is that application windows can be maximised, minimised (‘iconified’ in Linux terminology), and stacked partially above each other. Thus there are layers of placement on the desktop (‘top’ and ‘lowered’) and a mouse-click or cycling keybind (Alt+Tab) will raise a lowered window above others, i.e. to the top layer.

In contrast, a tiling desktop presents application frames (‘windows’) in neatly ordered tiles in a single layer. There’s no lowering or raising, there’s just shifting focus from a tile to another by keybind or mouse. Normally there are no breaks in between the frames, so the space is put to maximum use automatically. Due to a single layer and tight positioning, any resizing and repositioning of a tile affects all other tiles. It is usually inconvenient with a mouse and cannot be done without consideration to the whole layout of the workspace. i3wm tiling
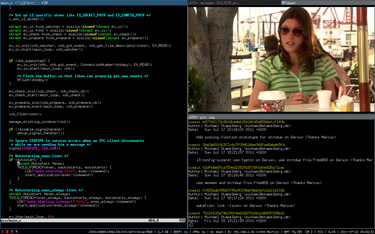
Some notes on the tiling desktop in the image. You may want to fullscreen the video, but this would naturally leave the rest of the tiles behind – which is similar to any windowing desktop. Alternatively, you may want to maximise the text editor window and resize the video smaller in a corner, for example when transcribing from the video, to give maximum space for writing and minimal necessary space to the video. In normal tiling mode, the video tile would always take up a column or row equal to its width or height, but on some tiling desktops there’s a specific ‘floating’ mode that can be assigned to a specific tile. However, the floating tile would always be on top of the rest of the layout – there’s no concept of layers, i.e. raising or lowering.

There’s also no concept of minimising or iconifying in a tiling desktop. You cannot add icons to the desktop to click and you cannot minimise all frames to view the desktop. To view the desktop (the background image or conky or what you may have there), you will need to open up a new fresh desktop space.

On the other hand, creating a maximally useful layout with two apps side by side is extremely easy in a tiling desktop. The classic dual-pane view of two apps side by side (as in comparing documents) is what normally happens in a tiling desktop all by itself when you open up the first app (it comes up maximised) and then the second (the first one resizes to take up half of the workspace and the second one takes up the other half). Very convenient.

When you want more apps open than the workspace can fit, there are easy default keybinds to send the focused tile to another workspace. If you cannot do without the experience of raising and lowering, you absolutely need multiple workspaces in a tiling desktop. Some tiling desktops may feature a ‘scratchpad’ which essentially does the same thing – the equivalent of lowering a window, hiding it from sight without opening another workspace, keeping it open in the background, ready to be recalled by a keybind. Even given a scratchpad, multiple workspaces are an inevitability in tiling desktops.

An additional compensating feature in tiling desktops is the ‘stacking’ or ‘tabbed’ mode. In this mode, the workspace does not create new gradually shrinking tiles when new apps are opened. Instead, every new app opens up maximised. Thus you always face a single maximised frame at a time, and to get to any other app, you switch to another maximised frame. This makes actually pretty good sense on small screens, such as netbooks.

From the user’s point of view, the choice between tiling and windowing first boils down to whether the user prefers mousing or keyboarding. Mousing is much more limited on a tiling desktop. Keyboarding is essential.

Moreover, not all windowing features are easy to re-create on a tiling desktop. For example, I personally began immediately to miss proper cycling, by which I mean switching between all apps without regard to their position on the screen or location on workspaces (Alt+Tab). The tiling desktops I tested preferred to recognise directional cycling, i.e. you have to know whether the app you want is to the left or right or up or down, and the number of workspace where it’s located. So, it’s important to remember where you open up things, perhaps by making workspaces topical, like “Internet” or “Office” or “Games”.

In summary, there are some very interesting features in tiling desktops which may make you switch from a windowing desktop for greater productivity. Or, if not switch, you may discover features that you may want to re-create in your familiar windowing desktop, for example always maximise windows in Openbox. And there’s a link available to a tiling window manager demonstration.
Four tweaks for .bashrc

Tweak #1

To enable arrow keys to search history for the ending of a half-typed line.

  bind '"\e[A": history-search-backward' bind '"\e[B": history-search-forward' 

Usage: Type something in terminal that you know is the beginning of a long command line that you occasionally need. Arrow keys up and down should complete it.

Tweak #2

Alert in OSD when a process ends.

alias alert='notify-send --urgency=low -i "$([ $? = 0 ] && echo terminal || echo error)" "$(history|tail -n1|sed -e '\''s/^\s*[0-9]\+\s*//;s/[;&|]\s*alert$//'\'')"'

Usage: cmd; alert where ‘cmd’ is an arbitrary command that performs a process, e.g. wget.

Tweak #3

An archive extractor without installing another program.

ext () {   if [ -f $1 ] ; then     case $1 in       *.tar.bz2)   tar xjf $1   ;;       *.tar.gz)    tar xzf $1   ;;       *.bz2)       bunzip2 $1   ;;       *.rar)       unrar x $1     ;;       *.gz)        gunzip $1    ;;       *.tar)       tar xf $1    ;;       *.tbz2)      tar xjf $1   ;;       *.tgz)       tar xzf $1   ;;       *.zip)       unzip $1     ;;       *.Z)         uncompress $1;;       *.7z)        7z x $1      ;;       *)           echo "'$1' cannot be extracted via ext()" ;;     esac   else     echo "'$1' is not a valid file"   fi } 

Usage: ext <file>

Tweak #4

Colors for man pages, Gentoo style.

  man() {         env \                 LESS_TERMCAP_mb=$(printf "\e[1;31m") \                 LESS_TERMCAP_md=$(printf "\e[1;31m") \                 LESS_TERMCAP_me=$(printf "\e[0m") \                 LESS_TERMCAP_se=$(printf "\e[0m") \                 LESS_TERMCAP_so=$(printf "\e[1;44;33m") \                 LESS_TERMCAP_ue=$(printf "\e[0m") \                 LESS_TERMCAP_us=$(printf "\e[1;32m") \                         man "$@" } 

Usage: Open a man page and notice the difference.

Less is the viewer and Nano is the editor

On GNU/Linux, a highly useful command for beginners is man. It means “manual” and it’s the documentation and tutorial that comes with the installed operating system.

About man pages

Man pages are accessed by typing man cmd where ‘cmd’ is a command that the user wants to know more about. For example try man cp.

A command that does not exist will result in this:

~$ man cmd No manual entry for cmd 

Unfortunately, not all commands and programs have man pages. Some are missing, because they are not installed in the operating system. (In this case, read about them online.) Some are missing, because they were never written. (In this case, cmd --help sometimes works. Or online search again.)

About ‘less’

Linux man(ual) pages are not big news actually. What may be more of a news is that the page viewer that is opened by man is actually a text file viewer that is called ‘less’. So, ‘man’ opens up ‘less’ a certain way.

Normally, when the idea is to view any text file, keep it open, and scroll around in it, it’s best to type less filename. A bigger introduction is available at man less, but some of the highlights of ‘less’ are as follows:

  • Move around with arrow keys, PgUp, PgDown, Space, Home and End.
  • By default, it wraps long lines rather than truncates them, just like all viewers and browsers should do, in my opinion.
  • Search with /. Find next with n and find previous with Shift+n.
  • Shift+f goes to the end of file and keeps reading it. This is highly useful when piping a file that is being written, to always see its end. For example sudo tcpdump > file | less file and in ‘less’ Shift+f.
  • Enable line numbers in the file with the -N option, i.e. less -N file.
  • Open the editor with v.
  • An overview of the keybinds under h.

Not all these features work when you have ‘man’ open rather than ‘less’, but for example v for editor (which indeed doesn’t work in ‘man’) is a great feature. Normally, one would not want to change the file by mistake, so it makes sense to open it in a viewer like ‘less’, but when the need for editing arises, ‘less’ conveniently redirects there when you press v.

About ‘nano’

The standard editor in Linux is ‘vi’, which happens to be my least favourite editor. The only thing I want to know about it is how to get out of it. For beginners, ‘nano’ is much more convenient, because it has a helpful commands list at the bottom by default.

nano demo screenshot

To enable ‘nano’ over ‘vi’ in the system, put in your .xinitrc or .bashrc (better – in both) the following line:

export EDITOR=/usr/bin/nano

This should be all for most purposes. Usually ‘nano’ comes preinstalled, so nothing to worry about.

Keybinds in ‘nano’

Nano does not use the same keybinds and shortcuts as ‘less’, but this is not a bad thing, because it makes sense to keep the editor function apart from viewer function. On the other hand, ‘nano’ meaningfully uses a bunch of shortcuts similar to bash readline function, such as Ctrl+a “to the beginning of the line” and Ctrl+e “to the end of the line”. Some other shortcuts, somewhat or totally different from bash readline function,* include:

  • Ctrl+w to search. Alt+w to repeat last search. Alt+r to find-and-replace.
  • Ctrl+k to cut the entire line and store it for pasting.
  • Ctrl+u to paste what’s stored.
  • Uninterrupted consecutive cuts are all stored-as-one, e.g. three times Ctrl+k cuts three lines below each other and then Ctrl+u restores them all. This enables moving consecutive paragraphs around in the file conveniently. Note however that when the cursor is moved between cuts, the sequence of cuts starts over.
  • Ctrl+r to open the system file list, enabling to pick a text file to add into the currently open buffer.
  • Ctrl+o to save the file either with the current or a different filename. In this state, Ctrl+t opens the system file list to pick a file to replace (save as).

* See man bash and search for “readline notation”.

Further configuration of ‘nano’

Nano uses the .nanorc file for further configuration. An example of it is located at /etc/nanorc or thereabouts. My ~/.nanorc looks as follows.

  # by default, 'nano' justifies lines to terminal width # which only makes sense when used in 'mutt'; to disable set nowrap set softwrap  # to gain a line for editing, to smoothen scrolling  # and to enable some minimal mousing set morespace set smooth set wordbounds set mouse  # when familiar enough with the keybinds, uncomment # set nohelp 

More advanced hints for ‘nano’ and .nanorc can be found at /etc/nanorc and man nano. And here’s a link to the tutorial that got me started with ‘nano’ a few years ago http://www.tuxradar.com/content/text-editing-nano-made-easy

Rawdog RSS feed reader

Rawdog is a console-based RSS feed reader. After installation it doesn’t show up anywhere. It works by typing rawdog in terminal, but there’s some configuration to be done before it does anything useful.

First things after installation

First, copy the config and styles file into the home directory. Issue this in terminal:

cd # to make sure you are in your home directory mkdir .rawdog # to create profile directory for rawdog cp /usr/share/rawdog/config .rawdog/config # copies the default config file into the home directory cp /usr/share/rawdog/styles.css .rawdog/styles.css # copies the styles file into the home directory 

Add feeds

Then add an RSS feed that you want to follow:

rawdog -a https://vivaldi.net/blogs?view=blogger\&layout=listings\&id=443\&format=feed\&type=rss

The URL here is the feed for my Vivaldi blog. The backslashes are escapes needed for console.

Rawdog will report if adding the feed was successful. You can add many feeds of course. The added feeds will appear at the very bottom of the config file located at .rawdog/config.

Sync feeds

To sync the feeds:

rawdog -vWuw

The -W argument is supposed to check the state and state.lock files in the profile directory, i.e. to check the status of previous updates. The -u argument updates the feeds. The -w argument writes the output. The -v argument makes it verbose, so you don’t get bored while waiting the program to finish.

View and configure the output

Rawdog’s output is output.html, a static HTML file. To view the feed, open up .rawdog/output.html in a browser. The style for output.html is in .rawdog/styles.css.

Some other configurable parameters, such as the feed update frequency (rawdog -u doesn’t really update more frequently than the interval specified for the feed in the config file, 3h by default), date formats, etc. can be found in the self-explanatory config file located at .rawdog/config.

A handy oneliner

To keep an eye on the latest posts by my fav feed providers, I have made a command-line alias that stands for

rawdog -vWuw && elinks ~/.rawdog/output.html

Awesome when it works.

Tiling Window Manager Demonstration

Here’s an excellent video about what a tiling window manager is. (I’d prefer to call them tiling desktop as distinguished from windowing desktop, but this is just me.) 

https://youtu.be/sKDQ4rXFCF4 bspwm zsh urxvt tmux vim {Arch Linux}

And for a well-designed installable opsys with Bspwm desktop, you can try http://sourceforge.net/projects/manjarobspwmrespin/files/

W3M Quickstart

W3M is a console webbrowser from Japan. It comes with no upfront help or documentation and its default keybinds are outlandish, so I thought to write up a brief guide to get absolute beginners started.

When installed, the W3M browser can be launched from command line by

w3m $URL

where $URL is a web address or the location of a local HTML file. 

The cursor moves one character at a time with arrow keys, like in an editing environment. W3M is indeed a wonderful tool for web designers. For regular webviewers though, to navigate through the pages quicker, Tab is the key that jumps from a link to next and Ctrl+u does the same backwards. Spacebar scrolls downwards a screen-width and PageUp upwards.

At first it does not function as a proper webbrowser to visit most homey forums and social networks, because cookies are turned off by default. Options are available under the o key, but be ready for a steep learning curve.

Esc does not work as an escape key from fields and situations where the user inadvertently ends up. Ctrl+c does it, mostly. And Shift+b turns back a page (called “buffer” on the options page).

To enter a new web address, press Shift+u. To open all links on the page (a function that I always wanted for Elinks, but is available there only by means of a nasty workaround) press Shift+l.

/ searches forward on the current page. ? searches backward. Shift+q quits without confirmation.

Ins opens up a menu with some of the common commands that the user may need. If you need nothing there, close it with Ctrl+c.

Shift+h opens up a help page with all the rest of the default keybinds. To study and configure the keybinds, download the W3M default keybinds file to .w3m/keymap. Alternatively. you can save a vi-like set of keybinds for W3M to the same location.  

Lua for Elinks

Lua is a scripting language that can be used to extend the functionality of Elinks console browser. Lua can mangle webpages to render them more suitable to Elinks. Lua can also tweak Elinks’ settings in some contexts and launch external programs.

These days, Elinks console browser is commonly pre-compiled for Linux distros with lua support, so the only thing for the user to do is to begin writing extension scripts in lua. But some, such as myself, may be very weak in scripting, and need tutorials and samples.

The best sample is the official hooks.lua file for Elinks. Grab this file, save it to the .elinks directory and enjoy a different console browsing experience on Reddit, Linux Today and Dictionary.com, along with other websites mentioned in the file.

Study the file to devise hacks for the sites that you actually visit with Elinks. I would show what I came up with, but amazingly this blogging environment makes it too difficult to share pure code. <pre> and <code> tags get mangled.

The hooks.lua file testifies that it’s possible to expand Elinks’ keybinds, modify settings and call external programs by means of lua. It even makes YT work in Elinks via youtube-dl! These are all interesting areas to explore.

A Text Trim Command for the System

A text file to write in /usr/sbin/trim

  #!/bin/bash  while read -r i; do echo "$i" | tr '\n' ' '; done

And make executable:

chmod +x /usr/sbin/trim

Requires root rights. Then there should be a new command trim in the system.

Medit Custom Actions

Similarly as Thunar allows custom actions, the text editor Medit has the same feature. Here’s a little codebit to trim text with Medit.

Medit’s custom actions are under Preferences/Tools. There you will find a bunch of examples from which to learn, both in regular command line syntax and in more advanced scripting languages. This example is a regular command line.

I often need to trim whitespace and delete all line endings (which are left by pressing Enter) in plain text files. The command line which does it:

sed 's/^[ \t]*//;s/[ \t]*$//' | tr '\n' ' '

Custom actions need a label in Medit’s Tools dialog. In this case “Trim” is fitting. Other applicable settings:

  • Requires: Document
  • Save: Nothing
  • Type: Shell command
  • Input: Selected lines
  • Output: Insert into the document
  • Filter: Default