Tiling Window Manager Demonstration

Here’s an excellent video about what a tiling window manager is. (I’d prefer to call them tiling desktop as distinguished from windowing desktop, but this is just me.) 

https://youtu.be/sKDQ4rXFCF4 bspwm zsh urxvt tmux vim {Arch Linux}

And for a well-designed installable opsys with Bspwm desktop, you can try http://sourceforge.net/projects/manjarobspwmrespin/files/

W3M Quickstart

W3M is a console webbrowser from Japan. It comes with no upfront help or documentation and its default keybinds are outlandish, so I thought to write up a brief guide to get absolute beginners started.

When installed, the W3M browser can be launched from command line by

w3m $URL

where $URL is a web address or the location of a local HTML file. 

The cursor moves one character at a time with arrow keys, like in an editing environment. W3M is indeed a wonderful tool for web designers. For regular webviewers though, to navigate through the pages quicker, Tab is the key that jumps from a link to next and Ctrl+u does the same backwards. Spacebar scrolls downwards a screen-width and PageUp upwards.

At first it does not function as a proper webbrowser to visit most homey forums and social networks, because cookies are turned off by default. Options are available under the o key, but be ready for a steep learning curve.

Esc does not work as an escape key from fields and situations where the user inadvertently ends up. Ctrl+c does it, mostly. And Shift+b turns back a page (called “buffer” on the options page).

To enter a new web address, press Shift+u. To open all links on the page (a function that I always wanted for Elinks, but is available there only by means of a nasty workaround) press Shift+l.

/ searches forward on the current page. ? searches backward. Shift+q quits without confirmation.

Ins opens up a menu with some of the common commands that the user may need. If you need nothing there, close it with Ctrl+c.

Shift+h opens up a help page with all the rest of the default keybinds. To study and configure the keybinds, download the W3M default keybinds file to .w3m/keymap. Alternatively. you can save a vi-like set of keybinds for W3M to the same location.  

Lua for Elinks

Lua is a scripting language that can be used to extend the functionality of Elinks console browser. Lua can mangle webpages to render them more suitable to Elinks. Lua can also tweak Elinks’ settings in some contexts and launch external programs.

These days, Elinks console browser is commonly pre-compiled for Linux distros with lua support, so the only thing for the user to do is to begin writing extension scripts in lua. But some, such as myself, may be very weak in scripting, and need tutorials and samples.

The best sample is the official hooks.lua file for Elinks. Grab this file, save it to the .elinks directory and enjoy a different console browsing experience on Reddit, Linux Today and Dictionary.com, along with other websites mentioned in the file.

Study the file to devise hacks for the sites that you actually visit with Elinks. I would show what I came up with, but amazingly this blogging environment makes it too difficult to share pure code. <pre> and <code> tags get mangled.

The hooks.lua file testifies that it’s possible to expand Elinks’ keybinds, modify settings and call external programs by means of lua. It even makes YT work in Elinks via youtube-dl! These are all interesting areas to explore.

A Text Trim Command for the System

A text file to write in /usr/sbin/trim

  #!/bin/bash  while read -r i; do echo "$i" | tr '\n' ' '; done

And make executable:

chmod +x /usr/sbin/trim

Requires root rights. Then there should be a new command trim in the system.

Medit Custom Actions

Similarly as Thunar allows custom actions, the text editor Medit has the same feature. Here’s a little codebit to trim text with Medit.

Medit’s custom actions are under Preferences/Tools. There you will find a bunch of examples from which to learn, both in regular command line syntax and in more advanced scripting languages. This example is a regular command line.

I often need to trim whitespace and delete all line endings (which are left by pressing Enter) in plain text files. The command line which does it:

sed 's/^[ \t]*//;s/[ \t]*$//' | tr '\n' ' '

Custom actions need a label in Medit’s Tools dialog. In this case “Trim” is fitting. Other applicable settings:

  • Requires: Document
  • Save: Nothing
  • Type: Shell command
  • Input: Selected lines
  • Output: Insert into the document
  • Filter: Default

Thunar Custom Actions

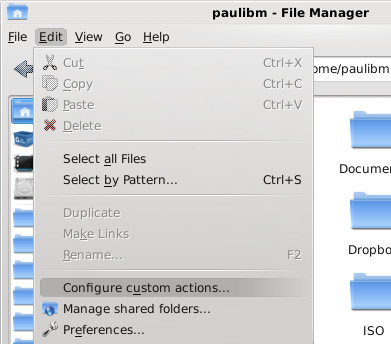
Thunar has a menu item for custom actions. It’s possible to set regular command line macros there to automatise some common repetitive tasks. For example my common repetitive task is to attach a bunch of files to an email message and I repeat the list of filenames in the email body.

Attaching a bunch of files to an email message in a graphical desktop environment is a simple drag&drop move, but the list of filenames is not that simple. It’s possible to do “copy” on the files and then “paste” in the email message body (or better in a plain text editor) which will result in a list of filenames, but this includes the full harddrive path of the directories.

The problem then is to get rid of the directory paths. It’s not too hard to do Find&Replace (text editors usually have it, more full-featured emailers also), but if the task is highly repetitive (which it is in my work), it gets tedious and an obvious need arises to automatise the task. This is something that users of Thunar can put into custom actions.

There are a few ways in which to automatise the task. Either the list of filenames could be copied to the clipboard, ready for paste, or the list can be opened up in a text editor, ready for review and further editing, if necessary. Let’s first consider copy to clipboard

List of Files onto Clipboard

From command line onto clipboard requires xclip. It needs to be installed, if it’s not already on the system. Then write this custom action:

ls -d %N | xclip -selection c 

Additionally you can set an icon to the custom action, so you will find it easier later in the Thunar menu. This done and applied, when you select multiple files in Thunar (I usually select everything in a folder) and choose the action, the list of filenames will be on clipboard – without directory paths – ready for paste.

List of Files into Editor

Copy to clipboard is a kind of hidden action. If you are not good at remembering or checking what you last copied, then a more visible action may be in order. The list of filenames can be automatically opened up in a text editor, so you see the result of the action.

The problem here is that not every editor allows straightforward piping. The only one I found that does this is Leafpad. I am open to suggestions how other editors accept external input. With Leafpad, it works like this:

ls -d %N | leafpad 

With every other editor, a possible solution is to output the list of filenames as a text file and then open the text file:

ls -d %N > filelist.txt && {editor} filelist.txt

where {editor} is to be replaced with the name of the text editor. This is coarse and unelegant, but the file can be deleted by the end of the operation:

ls -d %N > filelist.txt && {editor} filelist.txt && rm filelist.txt 

This will remove the text file as soon as the editor is closed.

PCLOS Mag has a more extensive tutorial complete with examples of scripts and Zenity prompts http://pclosmag.com/html/Issues/201308/page02.html

Network Manager and ethernet

Network Manager (or networkmanager) is a comfortable GUI app to switch between internet connections in Linux. The more recent versions of it seem to misbehave more and more, in my experience failing mainly with older Android modems. Here’s a workaround that may help.

The workaround requires dhcp as described at Manjarowiki, but the instructions are a bit different.

  1. Determine the devices: ls /sys/class/net This gives you normally three devices on computer to connect to internet: wifi, ethernet, and something called lo.
  2. Connect the Android phone, switch it to make modem, and see if it Network Manager fails. If it fails, move on to the next step.
  3. Determine the devices again: ls /sys/class/net This time it should list four devices. The fourth is your modem. It’s the one to go for with dhcp.
  4. As root, type dhcpcd enp* where enp* should be completed as your fourth device appeared in the previous step.
  5. Now there should be internet 🙂

The Manjarowiki instructions also include a step how to make the device permanent in systemd across reboots, but this is not feasible with mobile phone modem, as it sometimes gets differently assigned. The enp* identifier will be different, so it cannot be made permanent.

Review: Otter browser, weekly 46 release

Otter browser is a project to re-create Opera browser interface, as it stood during Presto era. (Nowadays Opera has moved on to the uninteresting Blink era and lost its unique interface.) 

Otter browser builds interface with Qt5 and renders with Webkit. The development has had a fast pace. The plans look moderately ambitious, i.e. achievable. In weekly 46 release, these Opera-like elements have been re-created:

  • Sidebar/Panel (currently featuring only History, Bookmarks, and Downloads)
  • Tray icon
  • Zoom slider
  • Paste-and-go (opens in same tab)
  • Pin tabs
  • Duplicate tab (called CloneTab)
  • Reopen closed tabs
  • Website Preferences and Quick Options (F12)
  • Save sessions
  • Private tabs and private sessions
  • Configure search engines
  • Set custom fonts, custom colours, and a custom stylesheet
  • Configurable keyboard shortcuts in INI file (has its glitches, not all shortcuts can be assigned)
  • Configurable menu bar items in JSON file
  • Easy switching between translations (you can translate your own language and thus contribute to the project)
  • Bookmarks import in Opera format (.adr) and HTML format. Opera bookmarks keywords get imported and assigned correctly
  • Keywords can be accessed with QuickBookmarkAccess dialogue just like in Opera with keyboard shortcut Shift+F2
  • Secondary address bar with keyboard shortcut F2
  • Rocker gestures (mouse buttons left+right to go forward in history, right+left to go back)
  • Some incremental Rewind and Fast Forward
  • Hint: take a look in about:config

The adress field is still not quite uptodate with suggestions et al., but at this stage I’d call Otter generally usable, particularly because of good cookie support. It’s usable as a general purpose browser, and it’s a joy to follow its development.

Most easily installable packages are available for Arch Linux and Windows. In other distros and opsyses you will have to hunt for Qt dependencies in order to get Otter installed.

Duplicate tab in DWB browser

DWB is a buttonless webkit browser with common-sense defaults. However, duplicate tab or clone tab function is missing out of the box.

Here’s how to create duplicate tab or clone tab for DWB browser. 

  1. Go to keyboard shotcuts manager. This is accessed by default with keys Sk or by open: dwb:keys.
  2. Scroll to the bottom of the page, to the text area Custom commands
  3. Enter: t:yank_primary;;tab_paste_primary

This will set t key as the shortcut for duplicate tab. If you need this key for something else, use some other key.

Usage case for duplicate tab

DWB intructions page at Archwiki offers a userscript to switch user stylesheets

#!/bin/bash # dwb:xg  CURRENT_STYLESHEET="$(dwbremote get setting user-stylesheet-uri)"  STYLESHEET_1="file://$HOME/.config/dwb/stylesheets/foo.css" STYLESHEET_2="file://$HOME/.config/dwb/stylesheets/bar.css"  if [[ "${CURRENT_STYLESHEET}" = ${STYLESHEET_1} ]]; then     dwbremote :local_set user-stylesheet-uri "$STYLESHEET_2" else      dwbremote :local_set user-stylesheet-uri "$STYLESHEET_1" fi

Set two stylesheets in position. Edit the file paths in the script accordingly. Save the script in ~/.config/dwb/userscripts/ and make it executable. Restart the browser. If everything went right, then xg keys will be switching between your two stylesheets.

The problem you will notice is that there’s no way back to the author-set stylesheets after you switched to user stylesheets. This is precisely where duplicate tab comes in handy. Duplicate tab will open up the same address in a new tab and reload author stylesheets.

Transparent background in console-based web browser

It’s cool to have a transparent background in your console-based web browser, such as Elinks or Lynx. Depending on your desktop image and text colours, the result may become illegible, unusable and detrimental to the eyes, but visually stunning awesomeness is guaranteed in any case.

There are several spins and versions of Elinks, so the simple tweaks I list here may not work for everyone. When I was researching how to achieve background transparency, the tutorials on the web suggested recompiling with certain options. However, for me, with version 0.13.GIT (obtained from Arch User Repository), all I needed was these entries in elinks.conf:

	set document.colors.use_document_colors = 0 	# set document.colors.background = black

This means that attempts to use webpage CSS has to be switched off and the black background (most usable option normally) has to be commented out, if it’s in use.

Then make Elinks acknowledge the transparency of the terminal under Options / Terminals / *terminal name* / transparency. Set transparency to “1”. This will result in something like this in elinks.conf:

	set terminal.xterm-color.transparency = 1

Now try it out 🙂

HOW TO TRANSPARENT BACKGROUND IN LYNX

Lynx’s functionality is also severely dependent on the precise version. Mine is 2.8.9dev.1, which is the most uptodate at the moment of writing. In some distros the latest version goes under the name lynx-cur or lynx-current.

    1. Look for the file /etc/lynx.lss
    2. Either copy the file to your user directory under some workable name to modify it as user or modify the original file as root.
    3. In the file, find these rows:
      normal:        normal:                 lightgray:black default:       normal:                 white:black
    4. And comment them out:
      #normal:        normal:                 lightgray:black #default:       normal:                 white:black
    5. Start Lynx with lynx -lss path-to-the-modified-lynx.lss

Note: If you chose to modify the original /etc/lynx.lss, it will be overwritten when the next Lynx update arrives.

Lynx instructions derived from https://bbs.archlinux.org/viewtopic.php?pid=1071270#p1071270