Network Manager and ethernet

Network Manager (or networkmanager) is a comfortable GUI app to switch between internet connections in Linux. The more recent versions of it seem to misbehave more and more, in my experience failing mainly with older Android modems. Here’s a workaround that may help.

The workaround requires dhcp as described at Manjarowiki, but the instructions are a bit different.

  1. Determine the devices: ls /sys/class/net This gives you normally three devices on computer to connect to internet: wifi, ethernet, and something called lo.
  2. Connect the Android phone, switch it to make modem, and see if it Network Manager fails. If it fails, move on to the next step.
  3. Determine the devices again: ls /sys/class/net This time it should list four devices. The fourth is your modem. It’s the one to go for with dhcp.
  4. As root, type dhcpcd enp* where enp* should be completed as your fourth device appeared in the previous step.
  5. Now there should be internet ๐Ÿ™‚

The Manjarowiki instructions also include a step how to make the device permanent in systemd across reboots, but this is not feasible with mobile phone modem, as it sometimes gets differently assigned. The enp* identifier will be different, so it cannot be made permanent.

Duplicate tab in DWB browser

DWB is a buttonless webkit browser with common-sense defaults. However, duplicate tab or clone tab function is missing out of the box.

Here’s how to create duplicate tab or clone tab for DWB browser. 

  1. Go to keyboard shotcuts manager. This is accessed by default with keys Sk or by open: dwb:keys.
  2. Scroll to the bottom of the page, to the text area Custom commands
  3. Enter: t:yank_primary;;tab_paste_primary

This will set t key as the shortcut for duplicate tab. If you need this key for something else, use some other key.

Usage case for duplicate tab

DWB intructions page at Archwiki offers a userscript to switch user stylesheets

#!/bin/bash # dwb:xg  CURRENT_STYLESHEET="$(dwbremote get setting user-stylesheet-uri)"  STYLESHEET_1="file://$HOME/.config/dwb/stylesheets/foo.css" STYLESHEET_2="file://$HOME/.config/dwb/stylesheets/bar.css"  if [[ "${CURRENT_STYLESHEET}" = ${STYLESHEET_1} ]]; then     dwbremote :local_set user-stylesheet-uri "$STYLESHEET_2" else      dwbremote :local_set user-stylesheet-uri "$STYLESHEET_1" fi

Set two stylesheets in position. Edit the file paths in the script accordingly. Save the script in ~/.config/dwb/userscripts/ and make it executable. Restart the browser. If everything went right, then xg keys will be switching between your two stylesheets.

The problem you will notice is that there’s no way back to the author-set stylesheets after you switched to user stylesheets. This is precisely where duplicate tab comes in handy. Duplicate tab will open up the same address in a new tab and reload author stylesheets.

Review: Otter browser, weekly 46 release

Otter browser is a project to re-create Opera browser interface, as it stood during Presto era. (Nowadays Opera has moved on to the uninteresting Blink era and lost its unique interface.) 

Otter browser builds interface with Qt5 and renders with Webkit. The development has had a fast pace. The plans look moderately ambitious, i.e. achievable. In weekly 46 release, these Opera-like elements have been re-created:

  • Sidebar/Panel (currently featuring only History, Bookmarks, and Downloads)
  • Tray icon
  • Zoom slider
  • Paste-and-go (opens in same tab)
  • Pin tabs
  • Duplicate tab (called CloneTab)
  • Reopen closed tabs
  • Website Preferences and Quick Options (F12)
  • Save sessions
  • Private tabs and private sessions
  • Configure search engines
  • Set custom fonts, custom colours, and a custom stylesheet
  • Configurable keyboard shortcuts in INI file (has its glitches, not all shortcuts can be assigned)
  • Configurable menu bar items in JSON file
  • Easy switching between translations (you can translate your own language and thus contribute to the project)
  • Bookmarks import in Opera format (.adr) and HTML format. Opera bookmarks keywords get imported and assigned correctly
  • Keywords can be accessed with QuickBookmarkAccess dialogue just like in Opera with keyboard shortcut Shift+F2
  • Secondary address bar with keyboard shortcut F2
  • Rocker gestures (mouse buttons left+right to go forward in history, right+left to go back)
  • Some incremental Rewind and Fast Forward
  • Hint: take a look in about:config

The adress field is still not quite uptodate with suggestions et al., but at this stage I’d call Otter generally usable, particularly because of good cookie support. It’s usable as a general purpose browser, and it’s a joy to follow its development.

Most easily installable packages are available for Arch Linux and Windows. In other distros and opsyses you will have to hunt for Qt dependencies in order to get Otter installed.

Transparent background in console-based web browser

It’s cool to have a transparent background in your console-based web browser, such as Elinks or Lynx. Depending on your desktop image and text colours, the result may become illegible, unusable and detrimental to the eyes, but visually stunning awesomeness is guaranteed in any case.

There are several spins and versions of Elinks, so the simple tweaks I list here may not work for everyone. When I was researching how to achieve background transparency, the tutorials on the web suggested recompiling with certain options. However, for me, with version 0.13.GIT (obtained from Arch User Repository), all I needed was these entries in elinks.conf:

	set document.colors.use_document_colors = 0 	# set document.colors.background = black

This means that attempts to use webpage CSS has to be switched off and the black background (most usable option normally) has to be commented out, if it’s in use.

Then make Elinks acknowledge the transparency of the terminal under Options / Terminals / *terminal name* / transparency. Set transparency to “1”. This will result in something like this in elinks.conf:

	set terminal.xterm-color.transparency = 1

Now try it out ๐Ÿ™‚

HOW TO TRANSPARENT BACKGROUND IN LYNX

Lynx’s functionality is also severely dependent on the precise version. Mine is 2.8.9dev.1, which is the most uptodate at the moment of writing. In some distros the latest version goes under the name lynx-cur or lynx-current.

    1. Look for the file /etc/lynx.lss
    2. Either copy the file to your user directory under some workable name to modify it as user or modify the original file as root.
    3. In the file, find these rows:
      normal:        normal:                 lightgray:black default:       normal:                 white:black
    4. And comment them out:
      #normal:        normal:                 lightgray:black #default:       normal:                 white:black
    5. Start Lynx with lynx -lss path-to-the-modified-lynx.lss

Note: If you chose to modify the original /etc/lynx.lss, it will be overwritten when the next Lynx update arrives.

Lynx instructions derived from https://bbs.archlinux.org/viewtopic.php?pid=1071270#p1071270

Mount /tmp to RAM and systemd

/tmp is a system section that is rather active. Temporary downloads get directed there. Package manager (system updater) works through it. Building packages, if not specifically directed elsewhere, also works through the same section.

Why mount /tmp to RAM?

If your hardware uses SSD instead of HDD, you may want to reduce disk activity as SSD is sensitive to it and supposedly gets worn out easily. Reduced number of disk writes can be achieved by mounting /tmp to RAM. There are instructions on the net how to do it.

However, systems built around systemd may already direct /tmp to RAM out of the box. I don’t know if all systemd distros do this, but Manjaro does. More specifically, systemd treats /tmp as tmpfs, which means /tmp is directed both to RAM and swap.

Why not mount /tmp to RAM?

Allowing /tmp to operate in RAM is desirable, if the system disk is an SSD instead of HDD. But when you use HDD, which is more likely, and you compile source into packages every once in a while with relatively limited RAM, then it’s more desirable to have /tmp operate on the disk rather than in RAM. When you compile code into packages and RAM runs out of space, you will get an error.

Find out if /tmp is treated as tmpfs

In terminal, type:

df -h

The result may be like this:

/dev/sda6           15G    6,3G  8,3G  44% / dev                3,9G       0  3,9G   0% /dev run                3,9G    9,0M  3,9G   1% /run tmpfs              3,9G    272K  3,9G   1% /dev/shm tmpfs              3,9G       0  3,9G   0% /sys/fs/cgroup tmpfs              3,9G     20K  3,9G   1% /tmp

Find /tmp in the last column and see if it says tmpfs in front of it in the first column. If yes, and you use HDD and have limited RAM, consider changing the situation.

Pointing /tmp to HDD

In distros with systemd, the solution is:

systemctl mask tmp.mount

After this, df -h should result in something like this:

/dev/sda6           15G    6,3G  8,3G  44% / dev                3,9G       0  3,9G   0% /dev run                3,9G    9,0M  3,9G   1% /run tmpfs              3,9G    272K  3,9G   1% /dev/shm tmpfs              3,9G       0  3,9G   0% /sys/fs/cgroup

Plainly, /tmp section should vanish. May take a reboot for full completion of the change.

Non-systemd

In other distros it’s more likely that /tmp was not pointed to RAM in the first place. If it was, it should be possible to change this by editing and reloading /etc/fstab.

Thunderbird: Disable Remote Images Warning

There are plenty of tutorials on the internet to get Thunderbird mailer to display images in emails, even though this is obvious: Press Show Remote Content. This post is about how to never see the warning again.

remote images warning

Seamonkey is a sane mailer. It displays the same kind of warning, but with two options, either to allow remote content or never warn about it again (and never show the content either). Thunderbird, however, has been sanitised towards insanity, so it only displays Show Remote Content button, but doesn’t seem to offer a way to get rid of the ugly button altogether.

Here’s how: Open Preferences –> Advanced –> General and find about:config. There, find the setting mailnews.message_display.disable_remote_image. Set this to false. Done.

Review: Manjaro Netbook Edition

(Here’s the official intro to Manjaro Netbook Edition https://forum.manjaro.org/index.php?topic=7319.0)

My screen of Manjaro Netbook Edition after a weekend of tweaking:
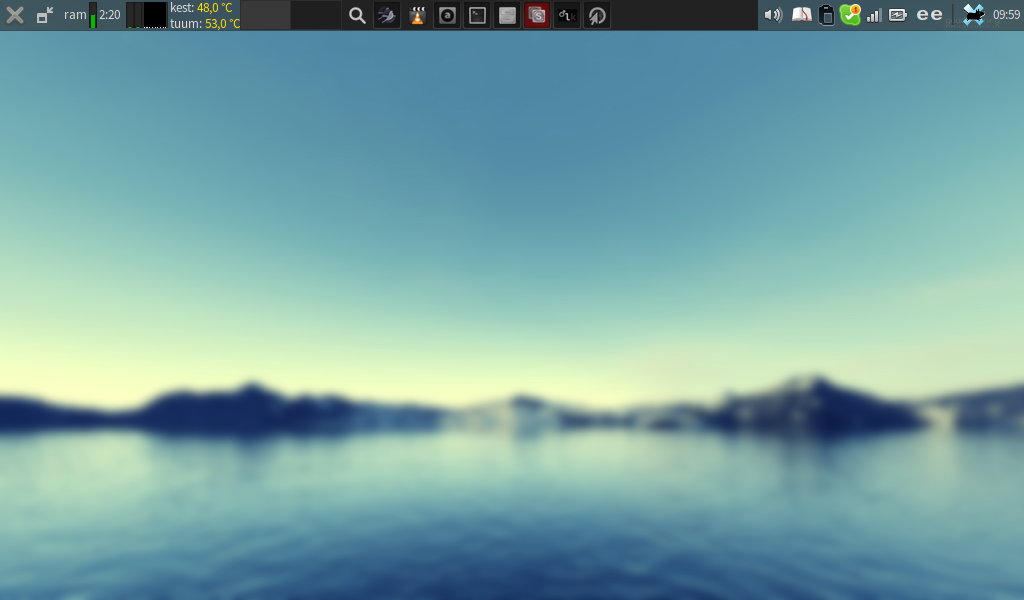
Netbook Edition screenshot after personalisation

Comparison with Manjaro Openbox Edition a.k.a. Manjarobox

LOGIN MANAGER

The login manager is MDM, known from Linux Mint. In my opinion it’s too heavy for netbooks. In Manjarobox you get Slim, which is much more appropriate. This was the first thing I changed to reflect Manjarobox after I installed the Netbook Edition.

DESKTOP

Manjarobox features Openbox, which is a light desktop. Light basically means that there are no desktop icons and the apps menu opens with right-click on the desktop, instead of having a dedicated taskbar button. Still, for example the invaluable systray is there.

In comparison, Netbook Edition features Xfce, a full-featured desktop environment, but with some important alterations specific to Netbook Edition. In normal Xfce you expect desktop icons. These are not available in Netbook Edition. The rest is pretty much there, even the new feature of window snapping-and-tiling-by dragging. (In Manjarobox this last functionality is available with keyboard shortcuts after some hacking.)

The most visible departure from the usual Xfce is the central taskbar in Netbook Edition. The central taskbar is replaced with DockbarX. The taskbar in normal Xfce behaves like in XP, whereas DockbarX always iconifies the open apps. When hovering the mouse pointer above the icon in DockbarX, you see the list of open windows with an opportunity to switch to them or close them with precision. Right-click on the icon provides you with some actions, such as pin, (un)maximise, and close the application – Win 7 style.

There’s a unique default behaviour configured into Netbook Edition’s desktop environment: Apps start up with maximised window. I was wary of this behaviour at first. This was one of the reasons why I didn’t try Netbook Edition on my netbook sooner. However, now I have seen it in action and it seems that this behaviour makes kind of sense in netbooks.

Some oddities occur due to this maximisation behaviour, for example when you copy files in Thunar, a full-screen progress window pops up instead of a small progress bar. Still, by default you have the well-considered unmaximise button on the taskbar. It’s also possible to easily configure a keyboard shortcut to toggle window maximisation in Xfce, so in the end this is not a problem. It’s a feature.

CHOICE OF APPLICATIONS

Compared to Manjarobox 0.8.8 which was very minimalistic, Netbook Edition comes with more apps, such as Midori browser (versus no browser in Manjarobox 0.8.8), Xfburn (I don’t know why this is here; how many netbooks have a DVDRW drive?), Audacious, VLC.

I liked the lack of apps in Manjarobox better. Manjarobox 0.8.8 even lacked the graphical applications manager (Pamac in Manjaro), so that you had to know the command-line way of adding apps at first. To compensate, Manjarobox comes with some important installation scripts in the apps menu – menu items to install the graphical applications manager, office software, printers’ drivers, multimedia codecs, and more.

Manjarobox’s installation scripts is something that is in turn missing in Netbook Edition and this is a serious miss in my opinion, because, for example, even though some multimedia apps are there in Netbook Edition out of the box, not all codecs are there.

SOME PERSONAL STUFF

In my screenshot above there are some visible additions to the default selection of apps in Netbook Edition:

  • Artha (the Wordnet dictionary with some added features)
  • Seamonkey
  • Skype
  • Otter browser (the pointer icon in the centre of the taskbar; Otter browser does not really have an icon, but this is how I made it to look like for now)
  • Xfce goodies, such as the CPU graph and Clipman; this is another miss in the default selection of apps in Netbook Edition in my opinion. To me, these goodies are inseparable from Xfce.

THE BEST IN NETBOOK EDITION

In comparison with Manjarobox, the screen lock and suspend at lid-close is configured properly out of the box. This how it should be in any OS version specifically catering to laptops and similar.

For this edition, the developers have optimised the kernel (for the i686 architecture version; Netbook Edition with x86_64 architecture doesn’t have this). I am too dumb to understand the benefits of the optimised kernel, but there’s more: Also Flash plugin, which I thought inappropriate for my netbook and I didn’t even try in Manjarobox, is specifically optimised and works like a snap in all browsers!

Now, disappointingly again, these optimised packages – linux312-netbook and flashplugin-netbook – don’t seem to be readily available in the repositories. Manjarobox users would really appreciate them.

I am a Skype user, so a remark on this too. In Manjarobox, Skype tended to crash in the middle of some kinda hot webcam sessions. Without much research I thought it can be blamed on hardware weakness. Now on Manjaro Netbook Edition these crashes do not occur. Either I got lucky or something’s truly optimised here ๐Ÿ™‚

CONCLUSION

All-in-all, there are some important things in this edition that make it worth trying, such as the optimised Flash plugin and considerately pre-configured lid-close. The misses are minor and easily remedied. If you have a netbook and some experience with Manjaro, give it a try.

My netbook has 1 GB RAM and Intel Atom CPU N450 (-HT-) clocked at Min:1000.000Mhz Max:1666.000Mhz. Netbook Edition’s Xfce desktop works here almost as snappy as Openbox that I tried earlier. I was perfectly satisfied with Openbox, but I like some of the added functionality in Netbook Edition, such as the window tiling by dragging, and I have learned to like the auto-maximised windows. With less RAM and weaker CPU however, Openbox would still be a smarter choice considering the resources.
Reformat USB stick in Linux

Here’s a follow-up to the blog post Create a bootable USB stick in Linux.

The first time I reformatted my USB stick from bootable to a normal file-storage device, I followed some other instructions, but now Webupd8.org instructions worked.

THE PROCEDURE

1. Insert the USB stick.

2. In terminal, issue:

dmesg | tail

3.There will be the description of the activities of the last active device. The device name will be between brackets as [sdd], [sdc] or [sdb]. See what you got and remember it.

4. Unmount the device. It should work by issuing in terminal:

sudo umount /dev/sdb

The sdb bit should be your own device of course. However, sometimes the command doesn’t work. I had to use the graphical file manager to unmount the device.

5. Reformat by issuing in terminal:

sudo mkdosfs -F 32 -n 'Label' -I /dev/sdb

The -F 32 can be omitted, but it ensures the most Windows-friendly format.

The ‘Label’ gives the device a name. You can have ‘MyUSB’ or such, if you like.

6. After the last command has done its thing (may take time), remove and reinsert the stick to test the result.

NTFS File System

When the aim is to format the stick as ntfs instead of msdos file system, step #5 is different:

sudo mkntfs -L Label -I /dev/sdb -F

Note the little differences from step #5 compared to msdos file system:

  • Label is without quotes
  • With ntfs, -F means “force” (to override an error message) rather than “format” (try mkntfs without -F and see what you’ll get)

All the other steps are the same.

Mplayer error

After a system update, Mplayer failed to launch. It gave this error:

mplayer: error while loading shared libraries: liblirc_client.so.0: cannot open shared object file: No such file or directory

Looking around the web for solution, I found that the fault is in the dependency called lirc-utils.

Solution #1: Reinstall lirc-utils

Solution #2: Recompile Mplayer without dependency on lirc-utils

In PKGBUILD under ./configure –prefix=/usr \ add –disable-lirc

Solution #2 found here https://bugs.archlinux.org/task/18526

Create a bootable USB stick in Linux

Note: These instructions erase the whole stick. The result will be just one bootable OS on the stick. In the next post I will tell how to get the stick back to normal, somewhat.

  1. Stick the USB stick in the computer
  2. In the terminal, determine the device:
    sudo ls -l /dev/disk/by-id/*usb*

    The device listed multiple times, with a number in the end and without, is the one to use. E.g. /dev/sdb

  3. If you have automount enabled, unmount the device.
  4. cd to the folder where the iso file is.
  5. Create bootable device:
    sudo dd if=filename.iso of=/dev/sdb bs=4M; sync

    The device path is an example. However, it must be without number in the end.

Learned from here http://crunchbang.org/forums/viewtopic.php?id=23267